There is a particular kind of magic that comes with preparing a nursery. It is one of the first tangible acts of parenthood, transforming an empty room into a sanctuary for someone you have not yet met. But between the avalanche of registry recommendations, the conflicting advice from every corner of the internet, and the very real constraints of space, budget, and time, that magic can quickly give way to stress. We have seen it dozens of times with our clients across New York City, Los Angeles, and Austin. The good news is that it does not have to be this way.
Over the years, our team at Swoon Spaces has designed and organized nurseries in sprawling suburban homes, compact Manhattan apartments, and everything in between. What we have learned is that the most successful nurseries are not defined by how much you spend or how closely they match a mood board. They are defined by how thoughtfully they are planned. A nursery that truly works is one where every item has a purpose, every system supports your daily rhythm, and the room itself feels like a deep exhale the moment you walk through the door.
This guide distills everything we know about setting up a nursery that is as beautiful as it is functional. Whether you are starting from scratch or reimagining an existing space, these are the principles and practical strategies that will serve you well through the sleepless early weeks and far beyond.
Begin With the Layout, Not the Decor
The single most common mistake we see expecting parents make is choosing furniture and decor before thinking about how the room will actually be used. A nursery is not a showroom. It is a workspace, one that needs to function flawlessly in the dark, with one hand, on very little sleep. Layout should always come first.
Start by mapping out the three essential zones every nursery needs:
- The sleep zone: Anchored by the crib, this area should be positioned away from direct sunlight, drafts, and any wall-mounted cords or fixtures. Ideally, the crib sits against an interior wall where temperature fluctuations are minimal.
- The changing zone: Your diaper station should be within a few steps of the crib but positioned so you never have to turn your back to a baby on the changing pad to reach supplies. Everything you need (diapers, wipes, cream, a change of clothes) should be within arm's reach.
- The feeding and comfort zone: A nursing chair or glider, a small side table, and a soft light source create the foundation of this area. Position it near an outlet for phone charging and close enough to the crib that transferring a sleeping baby requires minimal movement.
Walk through the room and physically trace the path you would take during a middle-of-the-night feeding. Pick up the imaginary baby from the crib, carry them to the chair, feed, burp, change if needed, and return to the crib. If any of those transitions feel awkward or require navigating around furniture, adjust the layout before you commit to it.
The best nursery is one that works beautifully at 3 AM with one hand and half-closed eyes. Every item should have a purpose and a place.
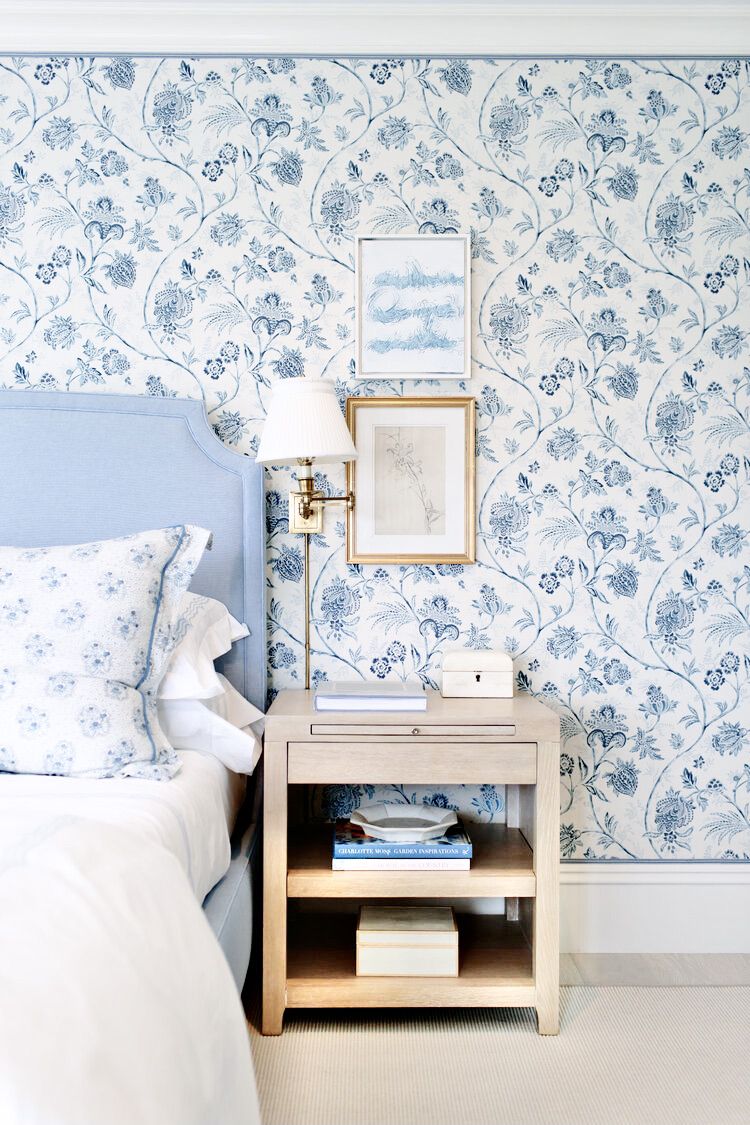
The Crib Area: Where Simplicity Is Safety
The crib is the heart of the nursery, and when it comes to the sleep environment, restraint is essential. The American Academy of Pediatrics is clear on this: a firm, flat mattress with a fitted sheet and absolutely nothing else inside the crib for the first year. No blankets, no pillows, no bumpers, no stuffed animals, regardless of how beautifully they complete the aesthetic.
What you do want to invest in for this zone are the supporting elements that make safe sleep sustainable night after night:
- Two to three fitted crib sheets so a clean one is always ready when the inevitable midnight blowout occurs
- A waterproof mattress protector layered beneath the fitted sheet to preserve the mattress through years of use
- Blackout curtains or cellular shades that block at least 95 percent of outside light. This is one of the single most impactful investments for daytime naps and early morning wake-ups
- A quality white noise machine positioned at least three feet from the crib, creating a consistent auditory environment that helps baby sleep through household sounds
- A wall-mounted baby monitor with both audio and video capabilities, keeping cords completely out of reach
We often suggest our clients resist the temptation to hang elaborate artwork or shelving directly above the crib. Beyond the obvious safety concern, a visually calm sleep area signals to your baby that this space is for rest, not stimulation. Save the beautiful prints and decorative touches for the walls your baby will see from the changing table or the feeding chair.
Building a Diaper Station That Truly Performs
In the first three months alone, you will change somewhere in the range of 2,400 diapers. That number is not meant to alarm you. It is meant to underscore why your changing station deserves the same thoughtful design attention as a chef's mise en place. Every item should be positioned for one-handed access, because your other hand will always be on your baby.
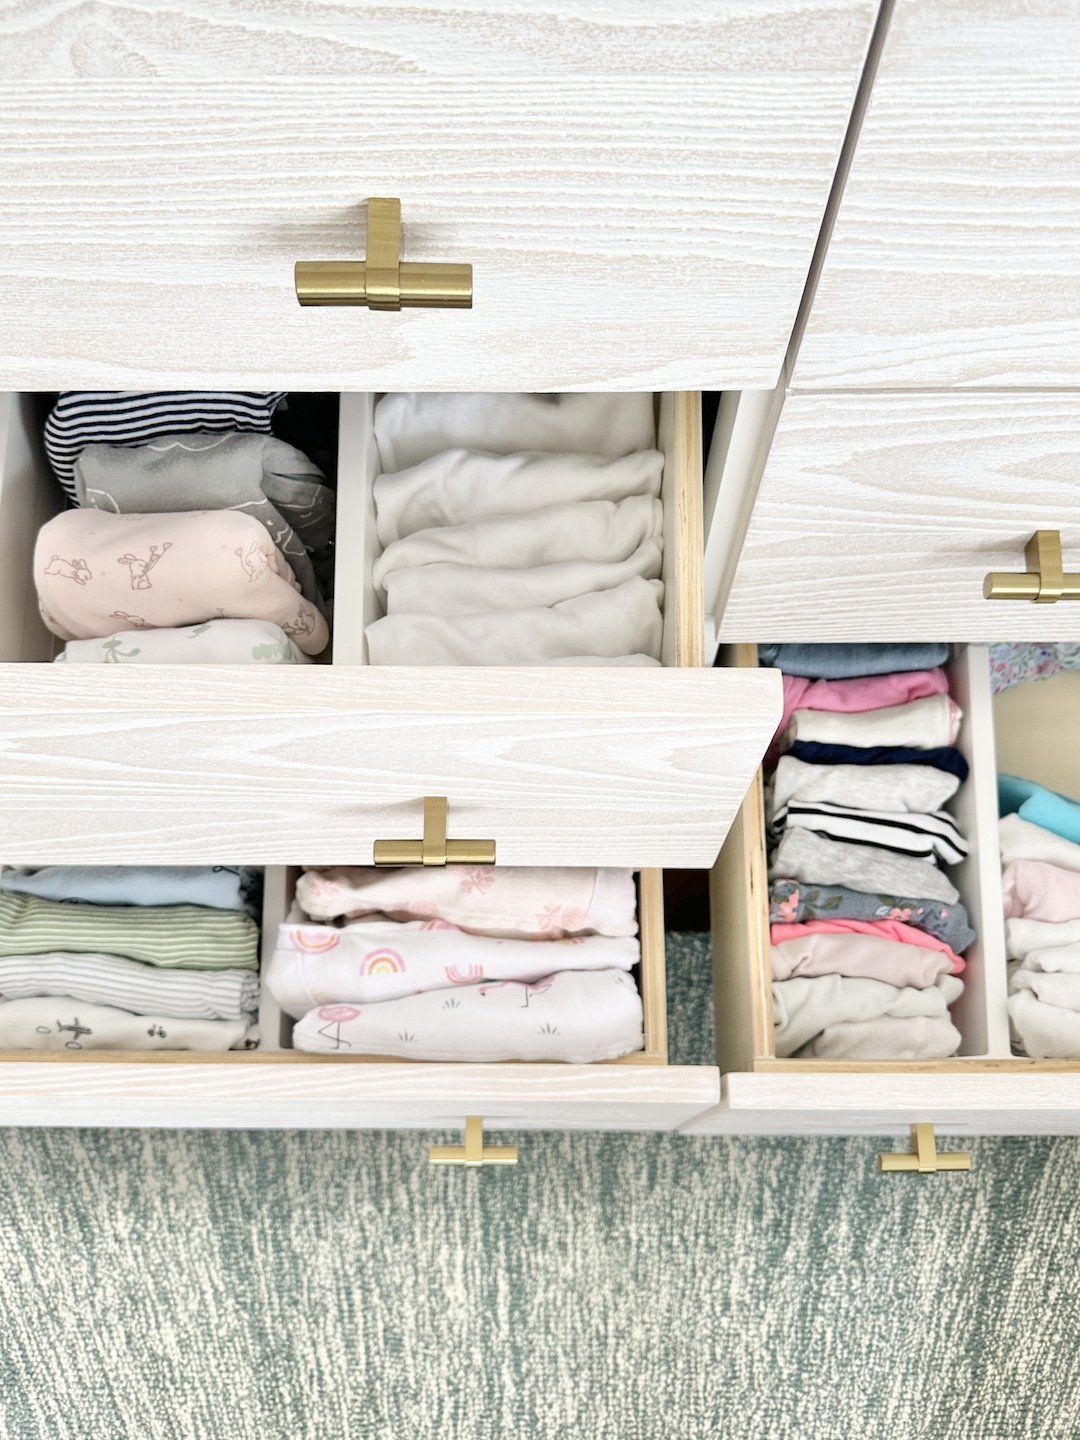
We strongly recommend using a quality dresser as your changing surface rather than a standalone changing table. A dresser serves double duty for years after your child outgrows diapers, and its drawers provide generous built-in storage. Secure a contoured changing pad to the top with anti-slip strips or a dedicated safety strap, and organize the surrounding area with intention:
- Top surface: Changing pad centered, with a small tray or caddy to one side holding diaper cream, hand sanitizer, and a pacifier
- Top drawer: Current-size diapers and wipes, organized with drawer dividers so you can grab what you need without looking down
- Second drawer: Burp cloths, extra onesies, and a spare sleep sack for quick outfit changes
- A lidded pail or disposal system positioned on your dominant-hand side, close enough to reach without shifting your weight away from the changing pad
One detail our clients consistently thank us for: keep a small basket of next-size-up diapers in the back of the top drawer. When your baby suddenly sizes out of their current diapers (and it always happens at the most inconvenient moment), you will not need to scramble.
Closet Systems That Grow With Your Child
Baby clothes are small, impossibly charming, and they accumulate with astonishing speed. Without a clear organizational system, a nursery closet can devolve from curated to chaotic within weeks. The framework we use with every client is designed to evolve seamlessly through the first two to three years of your child's life.
The Three-Tier Approach
- Current rotation (eye level and hanging rod): Install a double-hang rod to maximize vertical space. Use slim velvet or baby-sized hangers to keep outfits organized by type: everyday basics, sleepwear, and occasion wear. Everything your baby is wearing right now should be visible at a glance, so getting dressed never requires rummaging.
- Next size up (upper shelf or secondary bin): Store the upcoming size in a clear, labeled bin. When your baby outgrows the current rotation, the transition is effortless. Swap the bin contents onto the hangers and shelves, and move the outgrown items into storage.
- Outgrown and keepsake items (highest shelf or separate storage): Use acid-free storage boxes or vacuum-sealed bags, each labeled with the size and season. This prevents the all-too-common scenario of a closet gradually filling with clothes your baby has already outgrown while the items they actually need get buried.
For folded essentials like swaddles, burp cloths, and receiving blankets, we love shelf dividers or a hanging fabric organizer mounted on the inside of the closet door. These items need to be visible and accessible, not tucked into drawers where they are out of sight and out of mind.
The Feeding Corner: Your Personal Retreat
Whether you are breastfeeding, bottle-feeding, or a combination of both, you will spend a remarkable number of hours in your feeding chair during the first year. This corner of the nursery deserves to feel less like a station and more like a personal retreat, a place where you can settle in, breathe, and be fully present with your baby.
Choose a chair or glider that genuinely supports your body. Test it in person if possible, paying attention to lumbar support, armrest height, and how easily you can stand up while holding a sleeping baby. Then outfit the surrounding area with everything you will need within arm's reach:
- A refillable water bottle and a small snack container, because staying hydrated and nourished during nighttime feeds is non-negotiable
- Two or three burp cloths and a muslin blanket draped over the armrest
- A reading light with adjustable brightness that will not startle your baby awake
- Your phone charger and, if applicable, a remote for the white noise machine
- Nursing pads, nipple cream, or bottle supplies organized in a small caddy or basket on the side table
The key principle here is containment. A small, curated basket or tray keeps these essentials corralled and prevents the side table from becoming a catch-all for random items that migrate into the nursery over time. When another caregiver takes over for a feed (your partner, a grandparent, a night nurse), everything they need is immediately obvious without any explanation required.
Organization is not about perfection. It is about creating systems that reduce decision fatigue during the most demanding season of your life.
Smart Storage for the Items That Do Not Fit Anywhere Else
Nurseries present a unique organizational challenge because they need to house an extraordinarily diverse range of items, from tiny socks and nail clippers to bulky sound machines and backup sheet sets. The secret to a nursery that stays organized is maximizing every square inch of available storage, especially the spaces most people overlook entirely.
- Under-crib storage: Flat, rolling bins with lids are ideal for storing extra sheet sets, seasonal sleep sacks, and backup supplies. Choose bins that are low-profile enough to slide beneath the crib frame without obstructing the dust ruffle.
- Over-the-door organizers: The back of the nursery door and the inside of the closet door represent prime storage real estate. Use clear-pocket organizers for shoes, hats, small accessories, grooming supplies, or first-aid essentials.
- A low bookshelf with baskets: Woven or linen baskets on a low shelf create flexible, accessible storage for toys, board books, and soft goods. Label each basket so every caregiver knows exactly where things belong, and more importantly, where to put them back.
- Floating corner shelves: Use these for displaying books face-out, keeping a small clock visible, or housing a decorative element that brings warmth to the room without occupying any floor space.
We always encourage our clients to leave some storage capacity empty when they first set up the nursery. Babies come with a surprising amount of gear, and gifts will continue arriving for weeks after birth. Having designated empty space ready to absorb these additions prevents the creep of clutter that happens when every shelf and drawer is already full on day one.
Preparing Yourself: The Step Most Guides Skip
This is the part of nursery preparation that rarely makes it into the articles and checklists, but it is something we prioritize with every expecting client at Swoon Spaces. In the weeks surrounding your baby's arrival, your own needs will shift dramatically, and taking a small amount of time to prepare your personal spaces can make an outsized difference in how supported you feel during recovery.
Before your due date, spend thirty minutes reorganizing your own closet and bathroom:
- Move your most comfortable, easy-access clothing to the front of your closet: nursing-friendly tops, stretchy bottoms, cozy robes, and zip-up layers that are simple to get in and out of
- Pack away anything that requires effort or does not serve you right now, such as structured blazers, dry-clean-only pieces, and pre-pregnancy clothing that may not fit comfortably for several months
- Create a dedicated drawer or shelf for postpartum essentials so everything you need is consolidated in one place rather than scattered across the house
- Prepare two or three complete outfits on single hangers that you can grab without thinking when you need to get dressed and leave the house
This quiet act of self-preparation is one of the most meaningful gifts you can give your postpartum self. When you are navigating sleep deprivation and the steep learning curve of early parenthood, opening your closet to find exactly what you need, right where you expect it, is a small but profound form of care.
The Final Walkthrough: Testing Your Design
Once the nursery is set up, resist the urge to simply admire it from the doorway. Instead, walk through the room with these questions as your guide:
- Can you navigate from the door to the crib to the chair to the changing table in complete darkness without tripping over anything?
- Are all cords from monitors, lamps, and window treatments secured and entirely out of reach from the crib and changing areas?
- Is the room temperature easy to maintain between 68 and 72 degrees Fahrenheit?
- Could someone who has never been in this room (a grandparent, a night nurse, a friend who offered to help) find everything they need within sixty seconds?
- Do you have a clear, simple system for restocking diapers, wipes, and other consumables before they run out completely?
A nursery that passes this walkthrough is a nursery designed for real life, not just for photographs. It is a space that will carry you through the bleary-eyed midnight feeds, the spontaneous diaper explosions, and the quiet, luminous moments of rocking your baby to sleep while the rest of the world is still. That is the kind of room worth building.
If the prospect of designing and organizing all of this feels like more than you can take on right now, especially while simultaneously growing a human being, that is precisely what our team is here for. Our nursery preparation service handles every detail, from space planning and product sourcing to full installation, closet organization, and final styling. All you need to do is walk through the door, settle into your chair, and breathe.